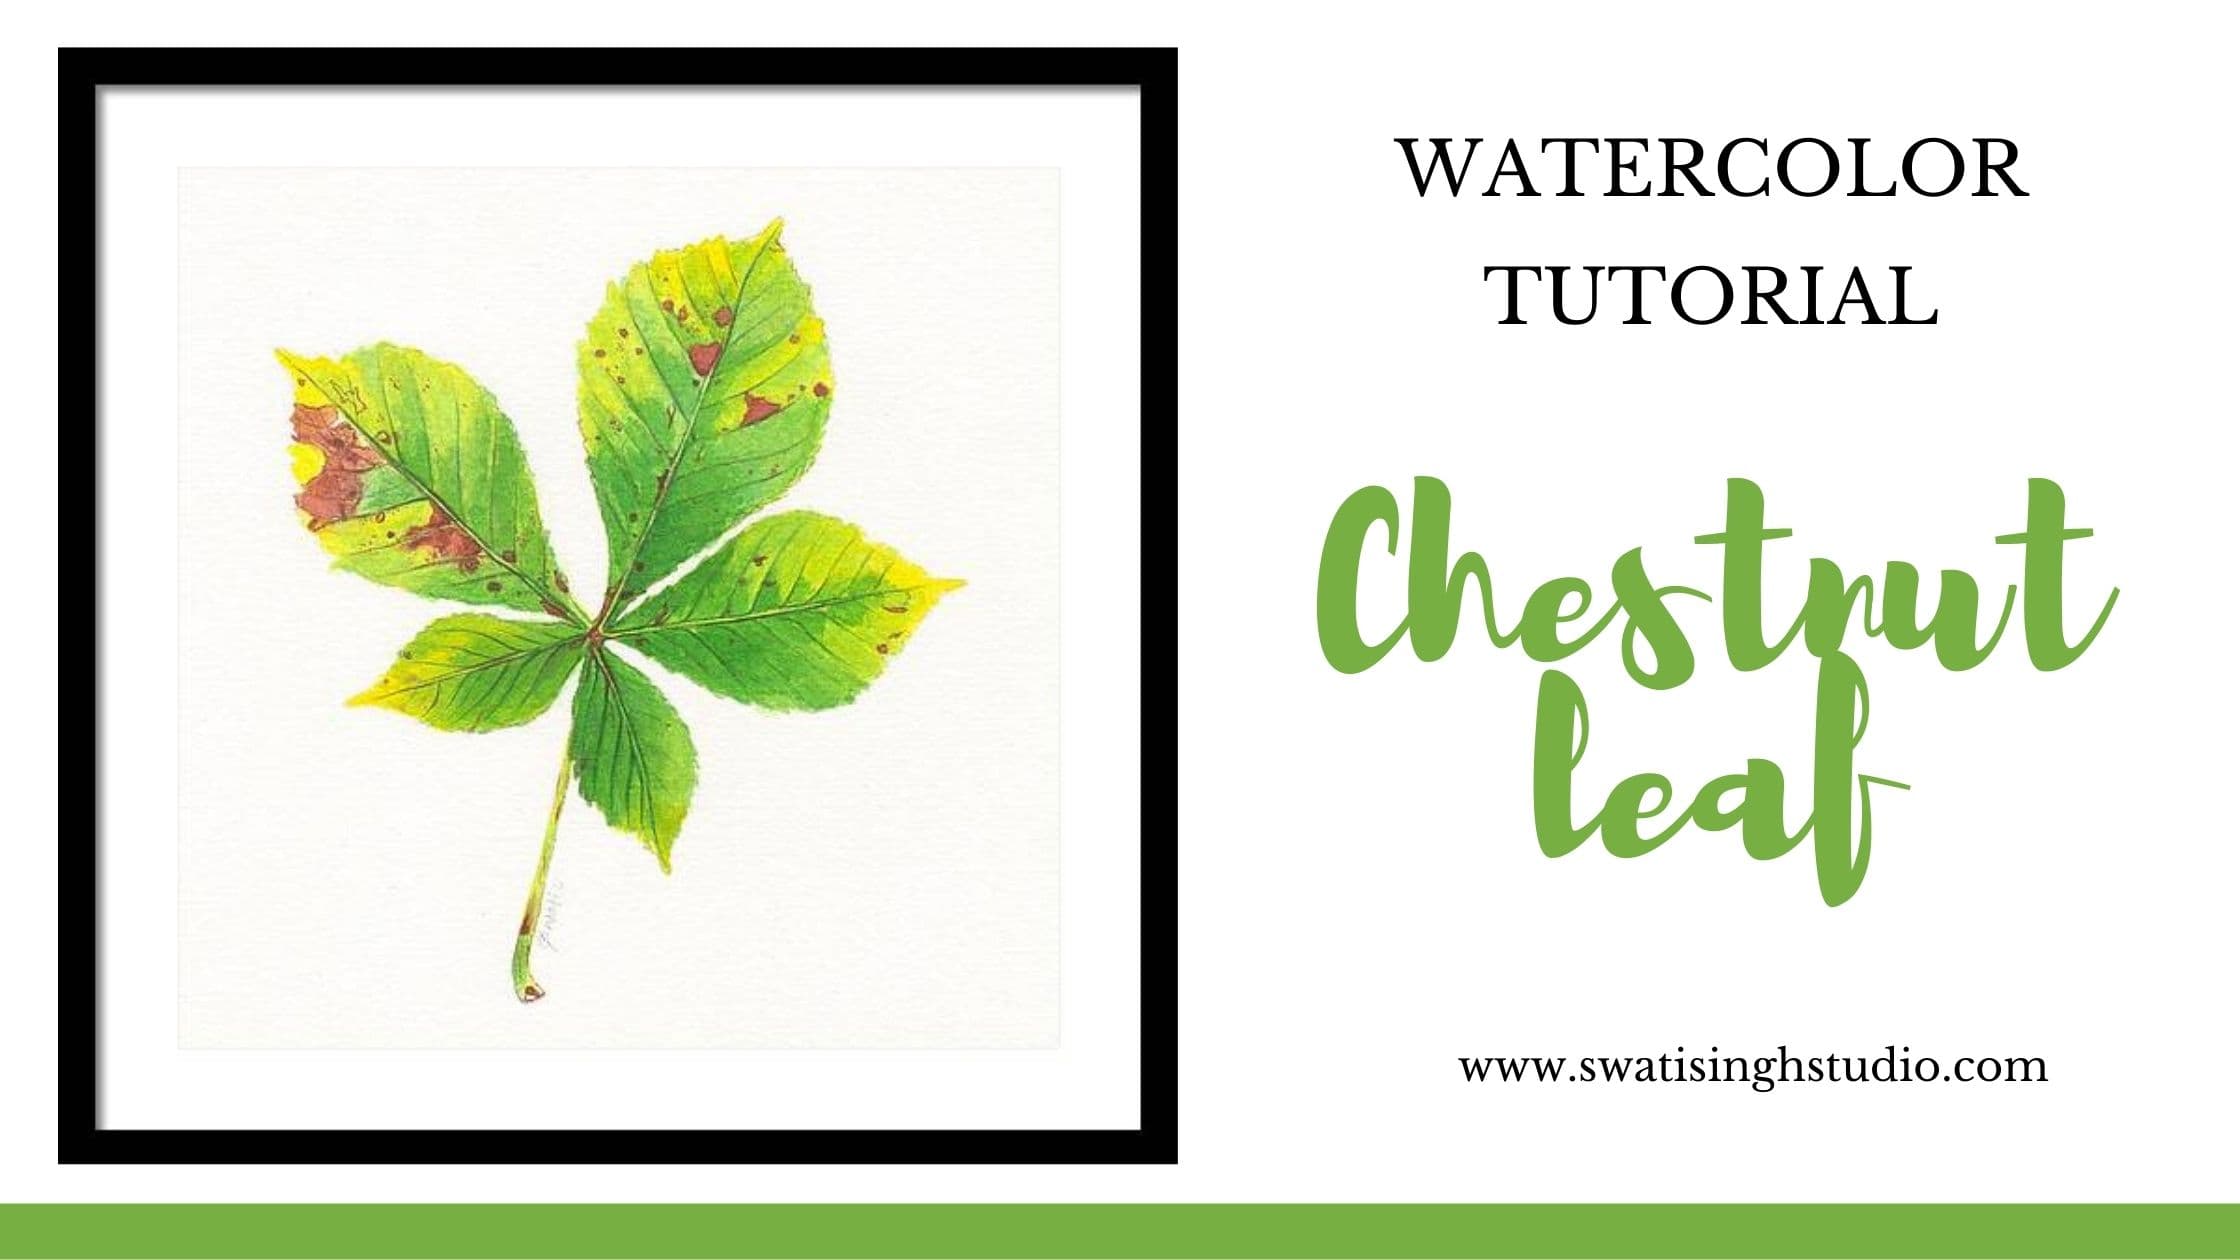
Hello lovely artists, I am back with yet another tutorial. And this time I am in the full autumn mood! Although it’s currently raining quite heavily in India, that does not stop me from thinking about the autumn breeze since September has arrived. Winter has always been my favorite month. Part of the reason is that I love snow and all the beautiful coats and boots we get to wear and that my birthday falls around the chilliest times of the winter.
But something about the fall season just gets me into that cozy mood if you can relate. We start wearing some layers and then the constant breeze around the trees. It just puts me into a deep-thinking mood!
Well enough of the mood talk here, it’s time to paint after all. For today I have a beautiful chestnut leaf with just the right amount of brown areas on it to suggest the arrival of the autumn season.
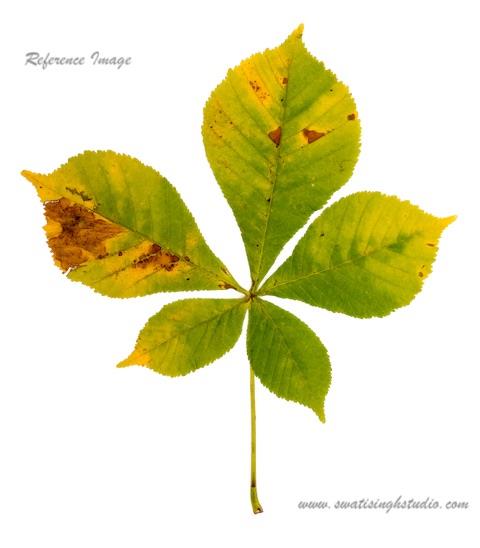
REFERENCE IMAGE
I like how chestnut leaves have around 5-7 leaflets attached to them. You do not require many leaves to create a beautiful composition. Each leaf is a unique composition on its own.
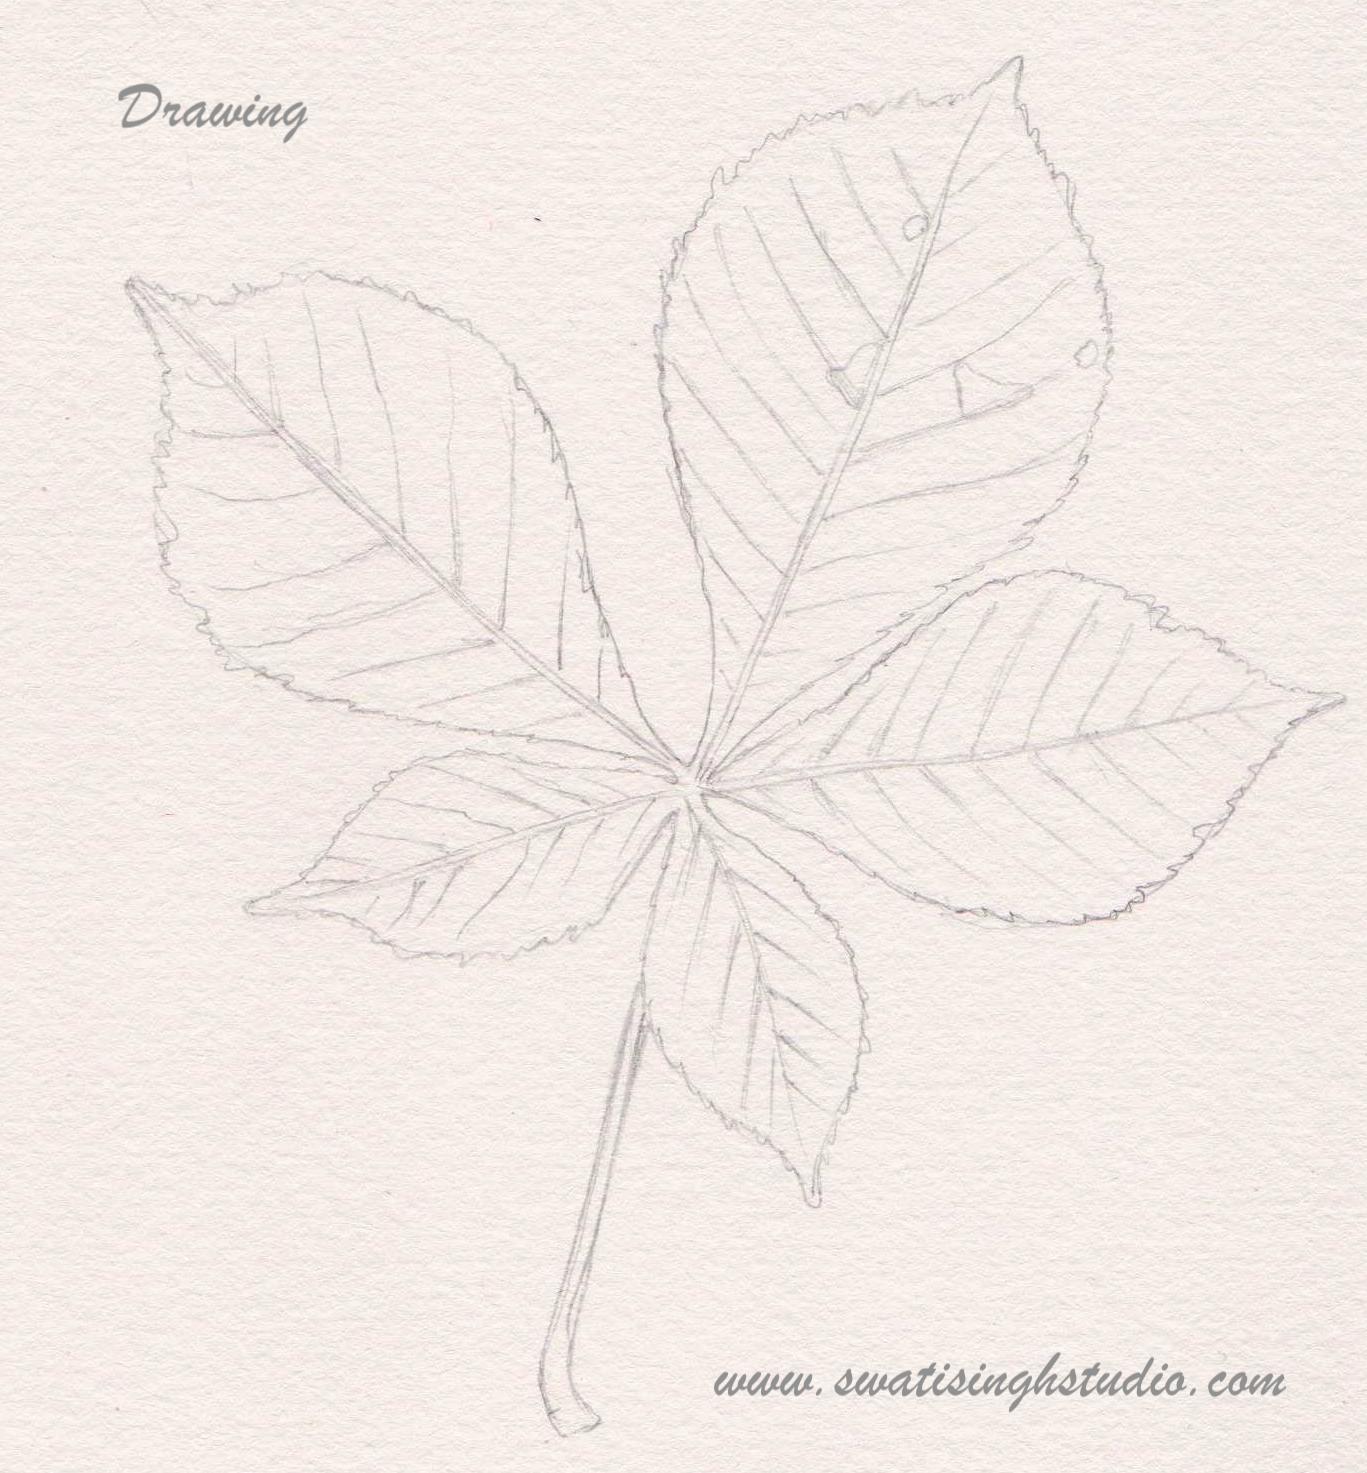
THE DRAWING
Each leaflet has toothed edges and pointed tips. I started by creating an overall outline of the shape and then went over the outline to create the zig-zag lines. The pencil line underneath acts as a guideline.
WATERCOLORS REQUIRED
1. Sap green
2. Cadmium yellow
3. Indigo blue
4. Lemon yellow
5. Burnt Sienna
6. Burnt umber
BRUSHES REQUIRED
Round brushes in size: #2 and #0
THE METHOD
We are going to tackle individual leaves one by one. The reason being we require each layer to dry completely before we add in more color. Hence, approaching the subject in parts helps us in giving us enough time for each layer to dry completely.
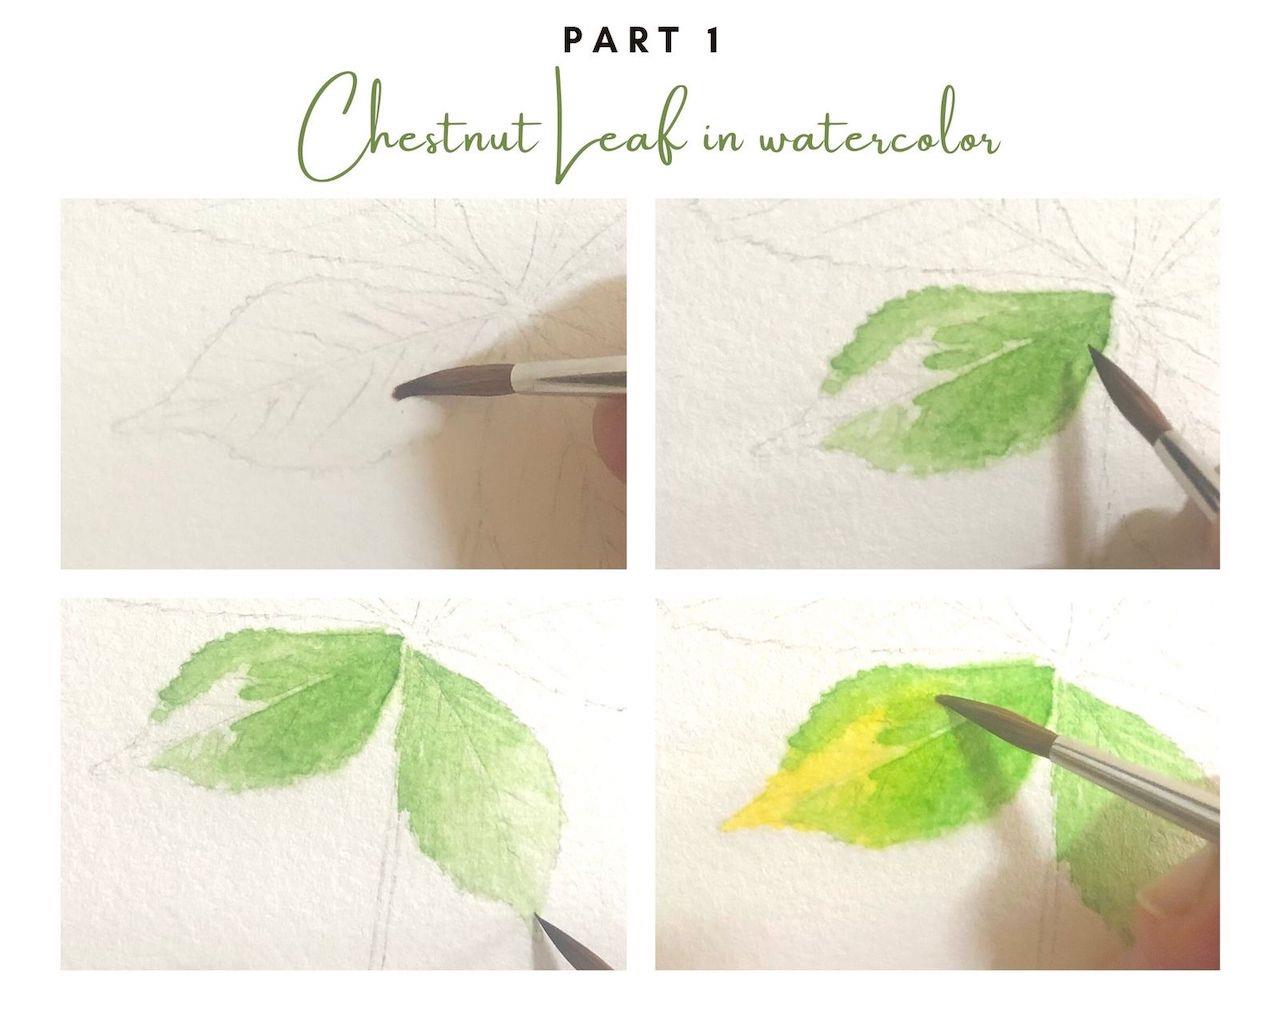
Step 1- Glaze the leaf with clear water. This helps prepare the sheet to accept watercolors better.
Step 2- While the sheet is still wet we will start adding sap green in areas where we see the green areas. Leave out any yellow areas.
Step 3- Let the previous layer dry completely. While it dries we will do the same with the other leaf.
Subjects like these give us plenty of time to work in different areas while one area dries.
Step 4- It’s time to incorporate a second color cadmium yellow in the leaves. To do that we need to first apply a clear water glaze over the entire area of the first leaf. Then start adding in cadmium yellow starting at the tip of the leaf where we see the most of this color.
Once you start moving inside the leaf where green is present simply go over the green areas.
Tip: As we go near the green areas the intensity of yellow decreases. We have already used up the majority of yellow around the tip of the leaf and our brush does not hold a lot of the color at this point anyways. Hence, going over the green with the same brush will just give a hint of yellow mixed in green!
Also, the layer of water underneath will prevent it from getting any hard edges of color.
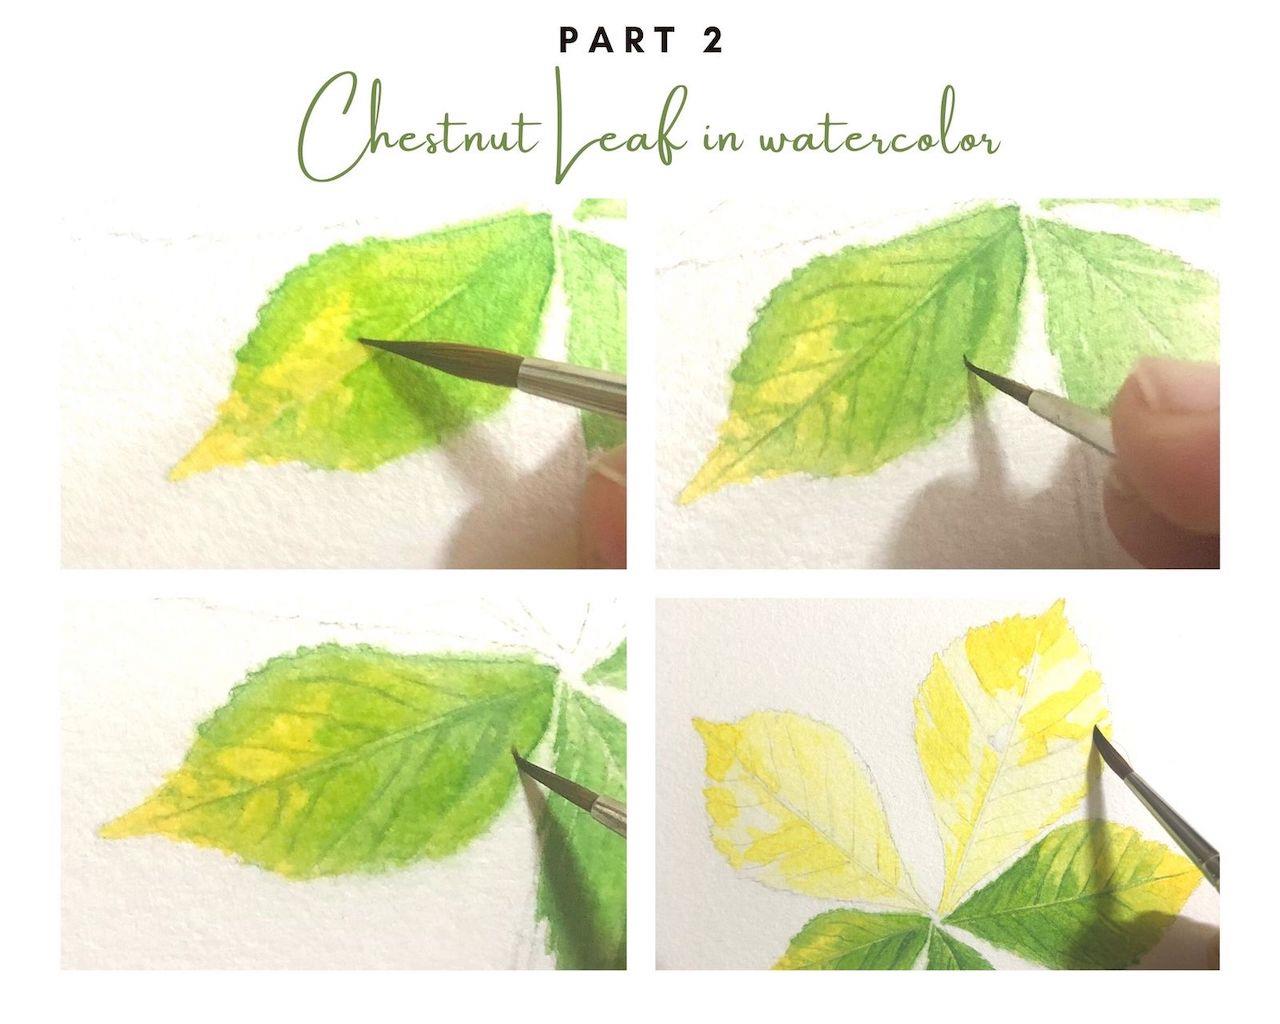
Step 5- While the yellow area is still wet you may drop in just a tiny amount of sap green where you see greenish-yellow color. Simply touch the tip of your brush when adding in the color. The wet layer will help it gently spread around.
Important- Do not overdo this step or else you might lose all the pure yellow color we see around the tip area.
Let this leaf dry completely and repeat the same steps in other leaflets in the meanwhile.
Step 6- Once the leaf has dried we can add in the fine veins. To do this use a #0 brush. Add in a tiny amount of indigo blue in sap green to get a slightly darker shade of green. Use this color to make fine veins.
Since we have not added too many layers of color at this stage and the colors used are all transparent, you will be able to see the pencil lines beneath. Use these pencil guidelines to make neat veins.
Step 7- With the same #0 brush take a little amount of the darker green we mixed earlier and start building it in small strokes over the leaf. This will help strengthen the color around the veins where we see some darkness in color. We are basically working in dry brush technique here without using any additional water.
Tip- If you feel you have picked more color than required simply dab your brush on a tissue paper first. If you see a lot of water. Do not put it on paper at all. Do it again and see how wet is your brush. Judging the amount of water might take you some time but is very crucial in getting the desired results.
Step 8- Repeat the above steps on other leaflets as well. You may also try the approach of laying down your yellows followed by greens, as I did in these examples. Both methods will work just fine as far as the two colors stay in the right places without mixing in too much. Of course, make sure that there is no harsh line formation where the two colors meet.
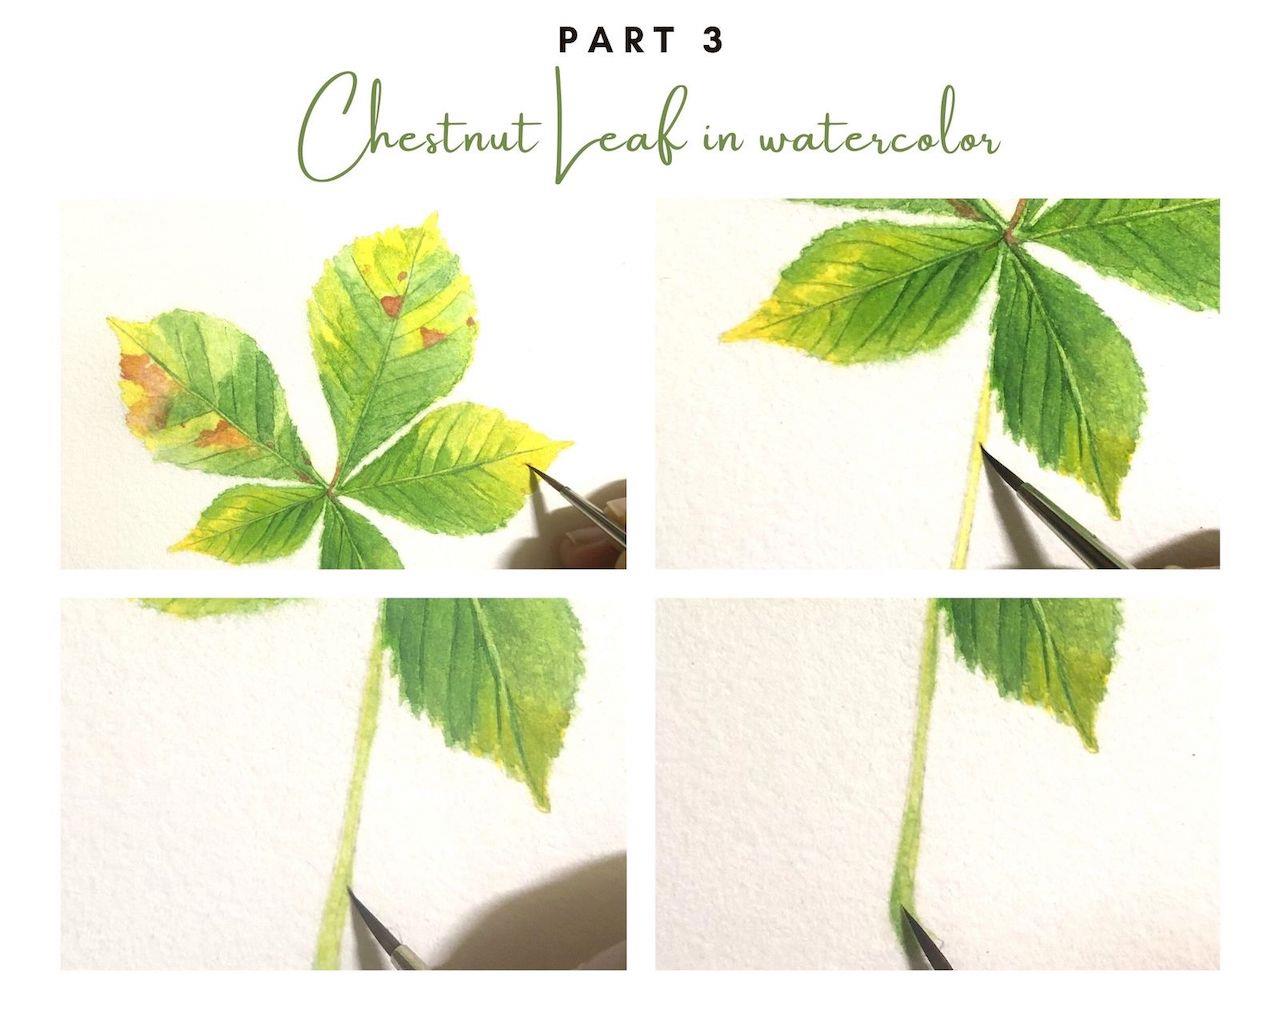
Step 9- Once all the yellows and greens are taken care of we need to make some fine marks over the leaf. The brown marks which make the leaf look even more beautiful and apt for the fall season. For this pick your #0 brush to draw the fine lines and spots we observe on the leaf using Burnt sienna.
Step 10- Moving on to the stem now. Apply a thin layer of lemon yellow. Let it dry completely.
Step 11- Now add a pale layer of sap green. This will give just a hint of sap green and will let the lemon-yellow shine through from beneath. Let the layer dry completely.
Step 12- The lower half of the stem has some dark marks. Simply mix in a tiny amount of indigo blue with sap green and apply this with almost a dry brush. Let the layer dry.
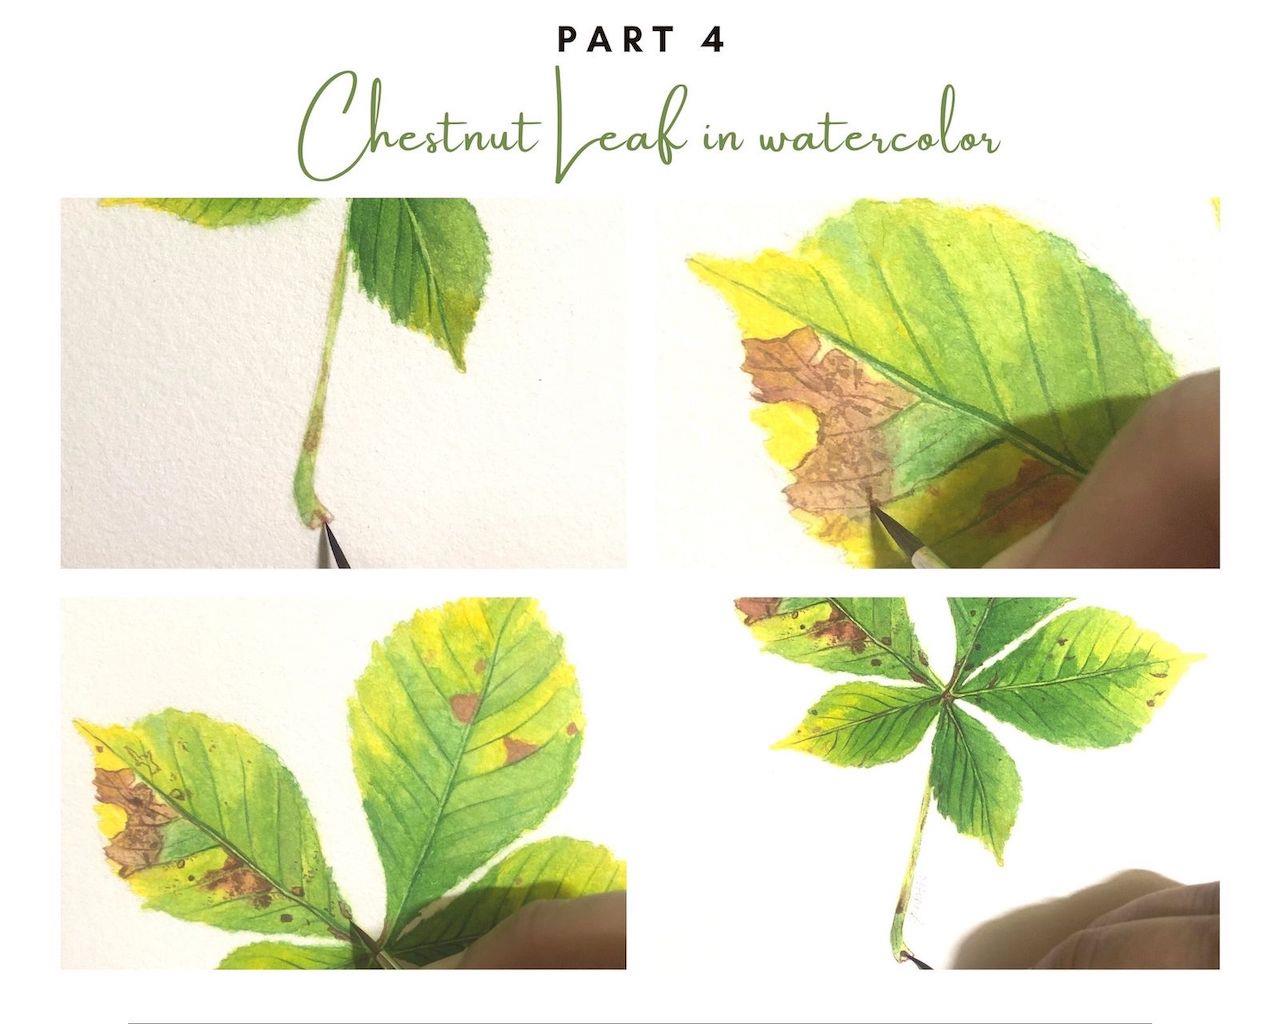
Step 13- Now make those dark brown marks in burnt umber using a #0 brush.
Step 14 and 15- Do the same with the leaflets. Apply the fine marks with burnt umber as shown in the image.
Step 16- Darken the brown spots on the stem if required.
And voila we are done!
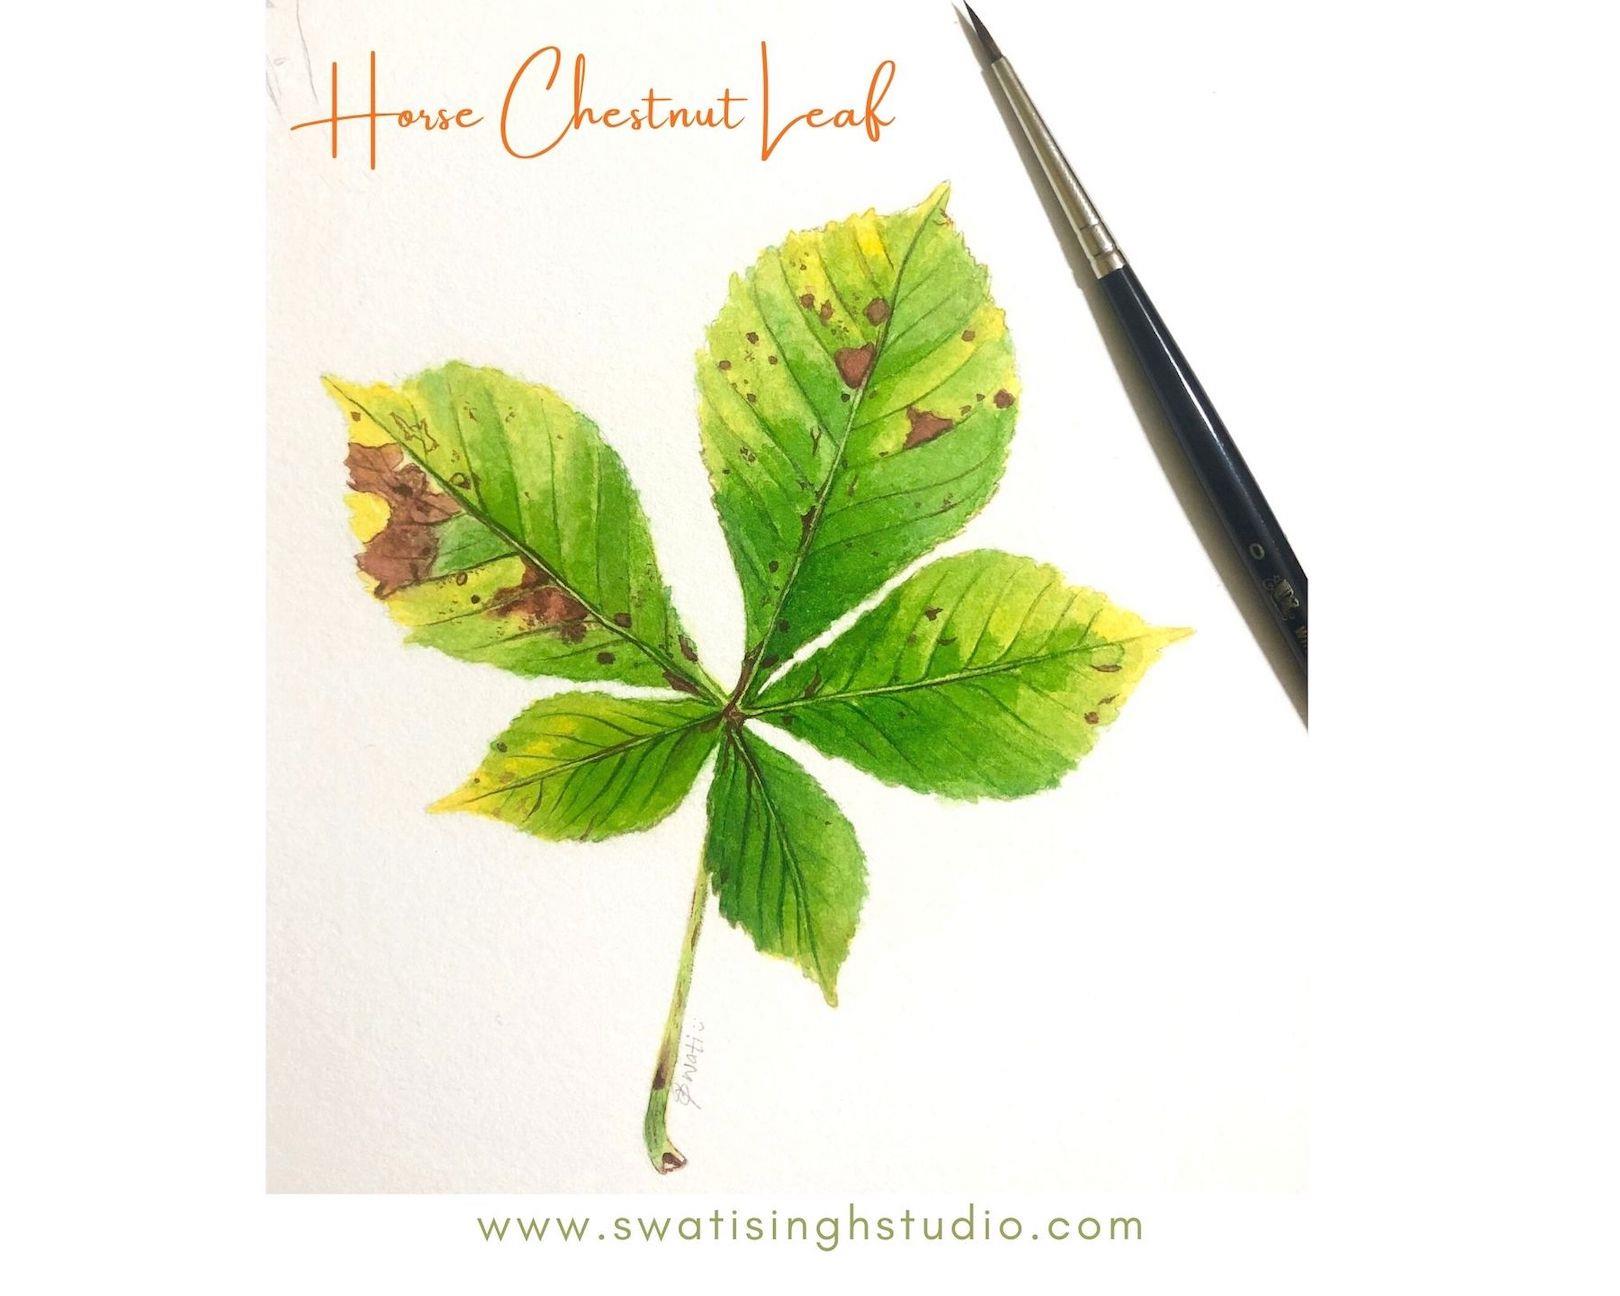
Painting this leaf has calmed me for sure. I encourage you to give it a go for yourself and it might put you in that autumn mood! You may even go out and look for some leaves that have started changing color (if you can find) and paint them this weekend. I can help you guide with the right color combinations if there are some different colors in your leaves. Simply, email me your queries.
I always feel these painting sessions at the end of the week are very therapeutic and puts one in a good mood.
Art prints and other merchandise of the chestnut leaf is now available in my Shop. Feel free to explore!
And let me know how your leaves turn out and E-mailme your artworks. I would love to see them!
Here are some more suggestions for the fall season which we painted previously. Feel free to explore them too.
I will be back with yet another tutorial soon. Till then enjoy life and..
Happy painting!
Swati